
As a Software Engineer on FlightAware’s Mobile team, Samantha Turnage works to refine and maintain the FlightAware iOS app. In addition, she was the intern coordinator for 2024.
This summer, FlightAware welcomed five interns from various parts of the country. These interns worked closely with our engineering team on their projects, achieving remarkable results that they later showcased to the entire company. Throughout their time with us, they also connected through social events and engaged in tech and career development discussions led by our engineers. We’re excited to share the outcomes of their efforts and spotlight their achievements. - Samantha T.
Kirthan Reddy

Hi! My name is Kirthan Reddy and I’m a software engineering intern at FlightAware. I’m a master’s student at NYU Tandon studying computer science and plan to graduate by December 2024.
My Project
My project this summer was to create a full-stack web application that would test the strength of the ADS-B signals captured by PiAware devices. PiAware is a Raspberry Pi powered radio receiver that captures ADS-B signals from aircraft in the sky and sends this data to FlightAware servers for processing. There are more than 34,000 PiAware devices that currently make up FlightAware’s flight intelligence network. We want to make sure that these devices can maximize signal coverage to improve flight intelligence at FlightAware.
To measure signal strength, I used a metric known as RSSI (received signal strength indicator), which measures the power of a radio signal. RSSI values closer to 0 indicate a stronger signal reception while those farther away from 0 indicate a weaker reception. I maintained a hash table in my application where the key represented the icao code (unique callsign of an aircraft) and the value represented a queue of up to 50 RSSI values. I computed the median of each queue and then calculated the median of the medians.
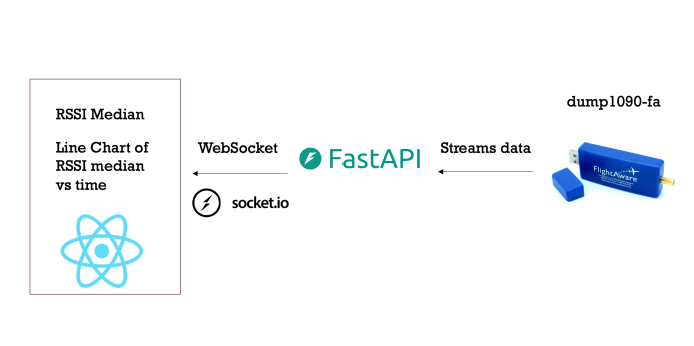
I built my app using a FastAPI backend and React frontend component. I used TypeScript to streamline error checking for the React app. FastAPI continuously reads ADS-B signal data from dump1090 (decoded data from software defined radio), performed the median calculations on the data, and streamed that data to React using a WebSocket connection. The WebSocket connection was implemented with the Socket.io library and FastAPI was served by Uvicorn, an asynchronous web server implementation.
The React webpage uses D3.js (a data visualization library) to render the average RSSI values within the last five minutes in a line chart. This chart was continuously updated, showcasing the average values within a shifting five-minute time window. This way the user could track the changes in RSSI values as they changed locations.
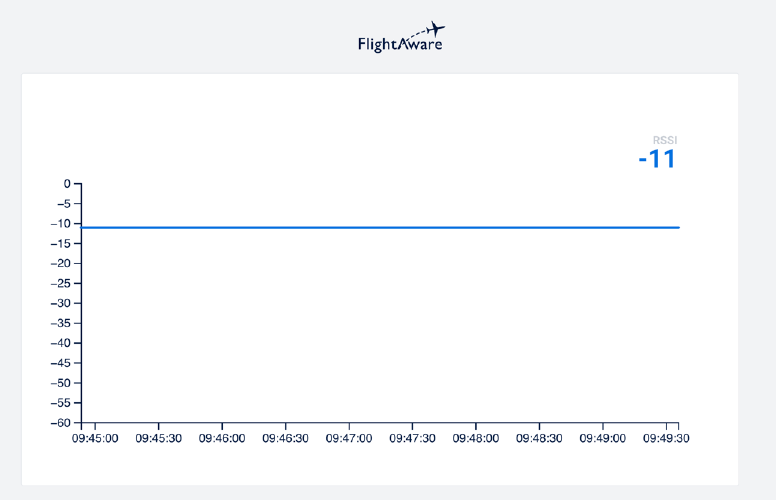
To test the app, I moved the PiAware device to different rooms in my house and my backyard to see if the line chart showed marked differences in RSSI values. I encountered some issues with noticing any differences in the RSSI values. I tried changing my algorithm and insulating my antenna with tin foil/saran wrap. I noticed that it did stop sending data when the ProStick was disconnected from the device. The algorithm still needs more work in my opinion to ensure it can produce measurable differences in RSSI values.
I packaged and deployed the app as a Debian package. A Debian package starts up at boot time and runs in the background. This way the user wouldn’t have to worry about running the application themselves. All in all, I learned a lot from this project. There were a few challenges I encountered along the way like stabilizing the WebSocket connection and setting up the Debian package, but I wouldn’t trade my experiences for anything.
Chad Fusco

Hello world, my name is Chad Fusco, and it’s a pleasure to share some insight into my experience so far this summer as a software engineering intern at FlightAware! I’m pursuing my master’s in computer science at Rice University. Previously, I earned an MS in Civil Engineering from Case Western Reserve University, and I have since pivoted into the exciting, fast-paced world of software. I also completed the software engineering immersive program at Hack Reactor a couple years ago, where I got my initial taste of modern full-stack web development. During my internship this summer, I was lucky to be fully integrated into the Web Core team, enabling me to put my knowledge into practice and further grow my skillset. The people at FlightAware are outstanding, and it’s been a honor to work alongside them and learn from them.
My Project
My project is to build a revamped version of the Account Management pages using Next.js, TypeScript, GraphQL, and other modern technologies. This project is a part of FlightAware’s WebNxt initiative, which you can read more about here. The goals of this project are two-fold:
- Migrate the Account Management frontend out of the current TCL monolith and into a Next.js app using modern tooling within an Nx monorepo (more on that later).
- Create a more dynamic, clean, and enhanced user experience. See the screenshots below for the current version and the proposed future version.
The new Account app is one of the first Next.js apps at FlightAware to be built in the web monorepo, which will eventually be used to house the entire FlightAware frontend. The monorepo architecture solves many of the issues with a monolith architecture (scalability, tightly coupled components), while also solving many of the issues with a strict microservice architecture (siloed code, complex deployment). We use Nx for our monorepo, which offers excellent CI tooling and can intelligently detect which projects are affected by a change, limiting builds only to those projects. You can read more about FlightAware’s decision to use a monorepo here.
New Library UI Components
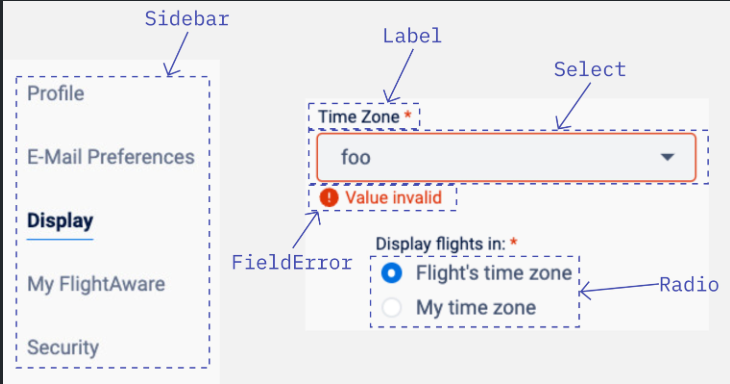
The first thing I needed to do was build the foundational building blocks for this application. I used this as an opportunity to add new components to the monorepo UI library for use by the Account app and any future applications. This was a fun exercise in abstract thinking, building generalized React components with Tailwind’s utility classes. Some of the new components are shown below:
Over the summer, I also participated in the WebNxt Reading Group, a technical study group organized by Jared Harvey for the web-focused software engineers at FlightAware. This phase of my project coincided with the group’s discussions on accessibility, semantic HTML, and responsive design, which was perfect timing! It was great to share ideas not only with my own team (Core Services), but with the Apps team, QA, and other engineers in the broader Collins Aerospace.
Through creating these modularized components, I strengthened my knowledge in web accessibility and responsive design, and got practice writing unit tests in Vitest, React Testing Library, and Jest.
App Architecture
Next, I needed to architect the application. The Account App is a Next.js application. Next.js offers a wealth of great features, including Static Site Generation (generating pages at build time), Server-side Rendering (generating pages on the server on each request), Server-side and Client-side Routing, and near-zero-configuration API routes called “Server Actions.” It also has some other nifty features like Layouts to share UI between routes, automatic route prefetching with its Link component, and image lazy loading and auto-sizing with its Image component. I’ve also found Next.js to offer a very nice developer experience.
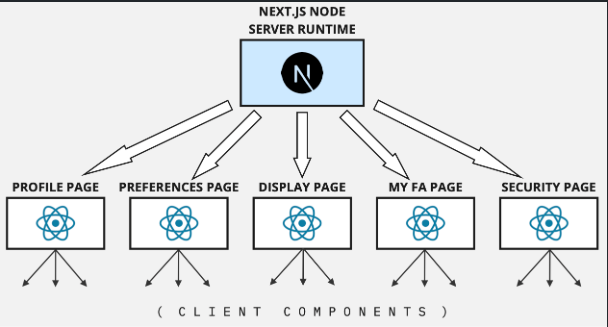
I decided to implement the app as a multi-page application rather than a single-page application (SPA). This allowed for future expansion of the app. It’s also expected to lead to better performance. Since each page is fetched separately from the Next.js server, more HTML can be rendered on the server, either at build or request time, and each request is for a portion of the app rather than the entire app. This results in smaller bundle sizes for each page, meaning less code for the client to download. A high-level diagram of the application is provided below. As an approximate mental model, I think it’s helpful to imagine each page as a separate React app, with Next.js’s Node runtime orchestrating the pages. Each page has Client Components, which are hydrated with Javascript sent from the server (each Server Component page) as a bundle.
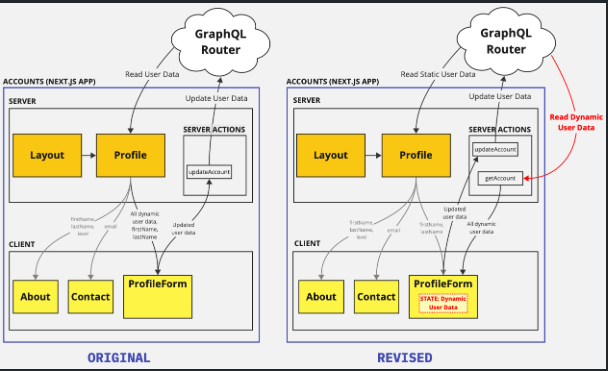
The architecture of each page went through a few iterations, with the first two shown below in simplified form. The orange boxes are Server Components, while the yellow boxes are Client Components. My initial thought was to fetch the user data from the Profile Page and pass it as a prop to the ProfileForm. The user would make some changes to their account and press Submit to send the updates to a Server Action, which would forward the update to the GraphQL Router. Once the GraphQL Router confirmed the update, the Profile Page would refresh.
However, refreshing the page turned out to not work as expected. Next.js provides a .refresh() method on its useRouter hook, which should, in theory, make a new request to the server, refetch the data from the GraphQL Router, and rerender the Profile Page all while maintaining the ProfileForm’s state and the user’s scroll position on the page. Curiously, this wasn’t functioning as expected, even with using revalidatePath to purge cached data for the route.
Besides this technical hiccup, the idea of the page “owning” the user data instead of the form isn’t intuitive in terms of data hierarchy. The Profile Page component barely does anything with the data besides passing it down to the ProfileForm component. Shouldn’t ProfileForm own and manage the user data? This led to the revised architecture shown below.
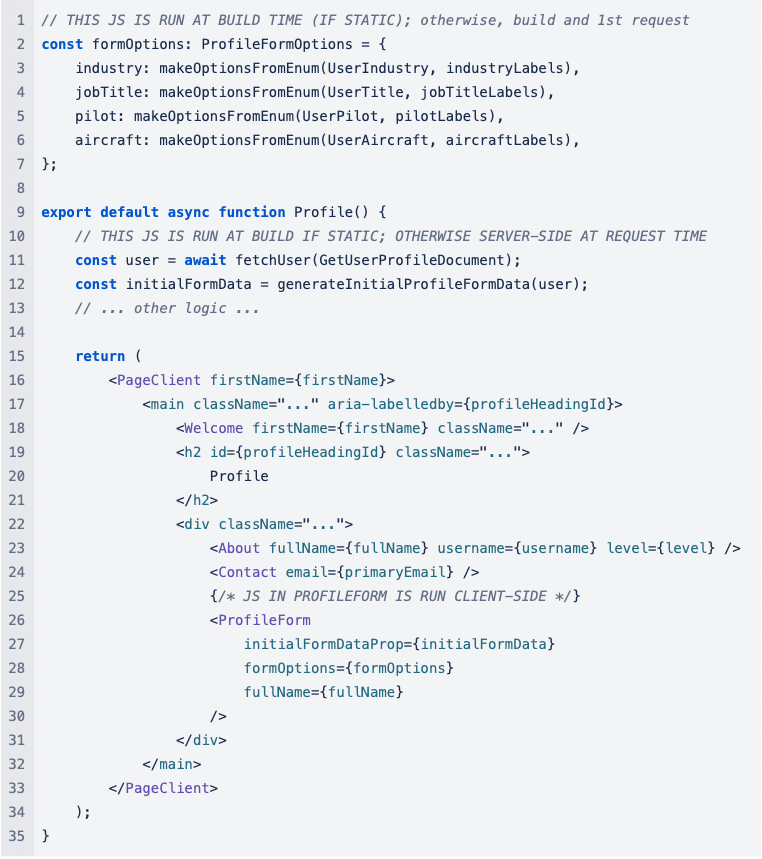
Every decision comes with a tradeoff. The downside to this revision is that more code would be downloaded from the server. Therefore, I ended up implementing a hybrid approach, where the “initial” user data is fetched by the Profile Page on the initial page load and passed to the ProfileForm, which manages the data from there on. This logic is demonstrated in the abbreviated code sample below from the Profile Page Server Component. Note how this takes advantage of Next.js’s seamless way of running JavaScript (JS) code on build, request, or client-side:
- The form field options (e.g. in a Select dropdown menu) are not user-specific and therefore can and should be generated at build time.
- The initial user data clearly can’t be fetched at build time, but can be fetched server-side at request time, so this code goes inside the
Profile()function. - Finally, because it is a Client Component, the JS inside ProfileForm is run client-side and consists of the logic for updating and refreshing the user data.
Connecting to the Backend
Using GraphQL
FlightAware’s WebNxt initiative is more than just frontend - it includes backend, too! In parallel with my work, two engineers working on the backend - Gabrielle Toutin and Gerald Burkholder - developed UsersNxt, a new GraphQL service for all user data. I used the urql npm package to interface with UsersNxt via FlightAware’s new GraphQL Router, which implements a federation of subgraph microservices (UsersNxt being one of them). A GraphQL API has a number of advantages over the more traditional REST API:
- Prevents overfetching and underfetching data. GraphQL is a “query language for APIs.” The client gets exactly the data it needs. Facebook originally developed this because it wanted to minimize the data transferred over the network to mobile devices.
- Faster development speed. We only need to define one endpoint. There is no need to figure out what endpoints you need and what data structures they should return ahead of time. We just define a data schema and we’re done.
- More flexible than REST. This is similar to the point above. There’s no need to go through multiple development iterations of the REST APIs to add/change endpoints as client needs evolve.
- Allows analysis of what data the client is requesting. Each client specifies exactly what information it’s interested in. This can help evolve an API by deprecating fields that are no longer requested.
These advantages greatly benefitted the Account App. Nearly all the data required for each page was unique to that page. Using the GraphQL API allowed me to request precisely what I needed for each page, while also allowing the flexibility to move form fields from one page to another, without needing to create a new Jira ticket to update the backend.
Automating GraphQL Typing
One of the common challenges when using different languages for the frontend and backend is that it disrupts the consistency of type definitions across the application. We would like to know what types the GraphQL API returns, and we’d like to enforce those types on the frontend in an automated fashion to prevent runtime errors. How can we do this?
To accomplish this goal, the monorepo uses the graphql-codegen npm package (Codegen). It is a plugin-based tool that can be used to generate GraphQL schema and operation TypeScript (TS) types on the frontend, and typing for the backend as well. In short, it gives you a fully typed TS response object when you place an API call to a GraphQL API. It accomplishes this by using GraphQL Introspection to fetch the types defined at a target URL.
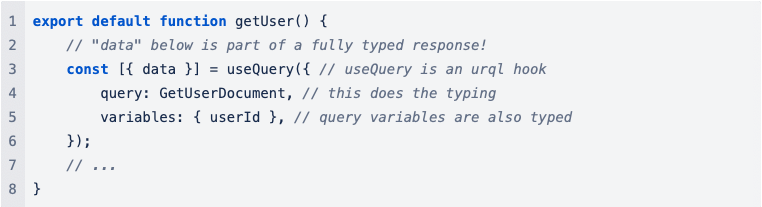
For example, for the GraphQL query below …
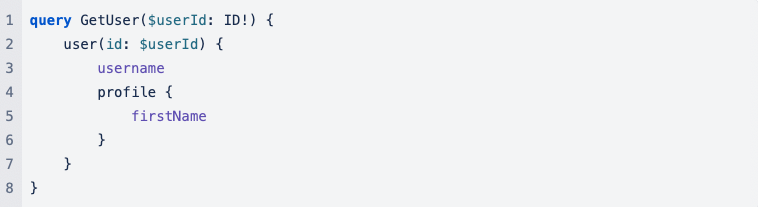
Codegen would generate the GetUserDocument object in the code example below:
As a side-task, I put forth a small proposal to change how we use Codegen in the WebNxt monorepo. Currently, Codegen is configured and run separately in each monorepo project. This is a leftover from projects that were originally developed outside the monorepo and then migrated in. The main downside to this is that the schema types, which are not project-specific, are generated separately for each project, and their generation is coupled with the generation of the operation types, which are project-specific.
I proposed setting up Codegen in one centralized location in the monorepo to have the schema types created in one file. I also proposed some configuration improvements, including migrating away from the typescript-urql Codegen plugin to reduce bundle size, doing a small study quantifying the savings.
After I shared the proposal with the other web developers, Gabrielle suggested an enhancement to further streamline the whole process: setup a GitHub Action to automatically create a PR to update the schema type when they change on the server. What’s great about this is that it truly isolates the schema type updates so that when developers run Codegen as part of a feature ticket, they are only updating the project-specific operation types. This prevents polluting PRs with unrelated changes and reduces unnecessary builds.
Authentication
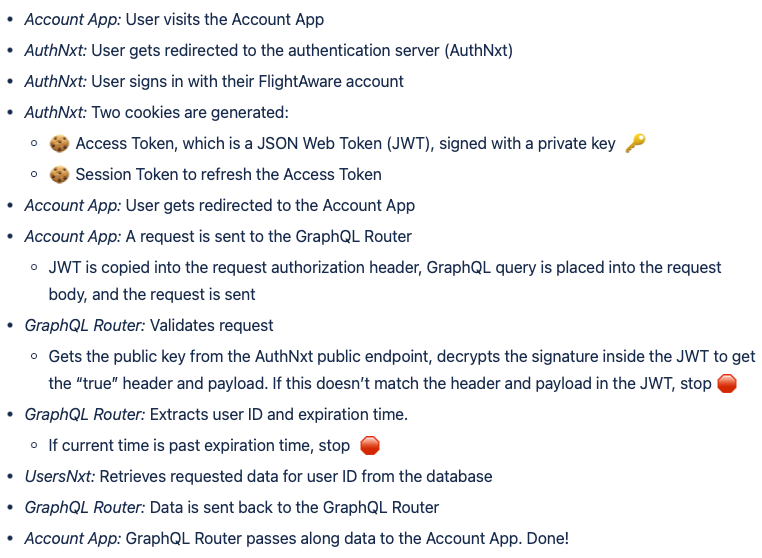
Security was a critical consideration in the development of the Account App. The Account App uses AuthNxt, the new WebNxt authentication service developed by Jared Harvey, Will Koury, and Joe Polastre, to ensure users visiting the app are who they say they are prior to allowing them to see and modify their account information.
AuthNxt uses token-based authentication, which offers advantages over session-based authentication. Using digitally signed tokens makes the process stateless and decentralized. The authentication server doesn’t have to remember which sessions are still valid, and multiple servers can serve the public key needed for the resource servers to validate requests.
Token-based authentication was new to me, and although it was largely taken care of and abstracted away by AuthNxt, I felt it was important to understand the fundamentals of how it works. The general flow is:
Final Reflection
I feel fortunate to have landed this internship at FlightAware. If somebody were to tell me three years ago that I’d be contributing to the very app I’ve been using for over a decade, I wouldn’t have believed them. The work here is varied and fascinating, and it’s great to be a part of it. Thank you to Jasmine, Samantha, Gabrielle, and everyone else who put together this internship program.
Lastly, I would be remiss if I didn’t send out two special thank you’s:
First, to my mentor, Jared Harvey. I don’t know if you volunteered to do this or were “volun-told,” but I don’t think I could’ve asked for a better mentor! Thank you for being so generous with your time, even through your big move to the East Coast. I learned a ton from you and look forward to more collaboration in the future.
Second, to my manager, Andrew Lewis. Thank you for your time and guidance over the summer. I felt trusted to deliver from the get-go. I appreciate that trust, which made me feel free to take initiative, explore new ideas, and grow professionally. Thanks for allowing me to join your ranks!
Bryan Garcia
Hello! My name is Bryan Garcia. This fall will be my last semester at California State University, Fullerton for my bachelor’s in computer science. After receiving my diploma in December, I plan to pursue my career in software engineering, particularly in full-stack web development. Outside of work, I love to camp, play video games (especially my favorite game Old School RuneScape), and hit the gym--this summer I achieved personal record of 225lbs for 9 reps on bench press!
This internship was a truly amazing opportunity to work with some of the most amazing and talented people. I met a lot of cool people, including my mentor, my manager, fellow interns, intern coordinators, and everyone else who are a part of the apps team crew. Some of my favorite moments included attending the web learning sessions, where we discussed and presented on topics related to our tech stack, as well as participating in the fun games with the other interns, like Among Us (I got kicked off the ship when I was innocent).
Content Page Modernization Project
With the help of my manager, mentor, and apps team peers, I created a web service that generates static HTML pages from JSON. This project has been part of an effort to modernize the FlightAware website by updating the stack to Next.Js and consolidating the codebases of all web services into a monorepo. This has been an exciting project to work on and a huge learning experience for me.
My first assignment was migrating the current industry pages over to the new app. The problem with the old industry pages was that they were hosted by a 3rd party vendor, which made it difficult to align with the rest of the FlightAware site (e.g. adding a new header or any type of custom component would not be possible) and required manually coding each page. The new industry pages would be completely managed within the monorepo--in other words, they (and any future content pages) would now be hosted within FlightAware, along with all the other apps within our monorepo.
With the industry pages being managed and served from the monorepo, they will have access to all the other monorepo shared libraries. Every web service would use the global component library and have the latest design and functionality at the same time.
Content Rendering
The content page modernization project is special in how the content is handled. Once a content management system has been built and setup, it will be a seamless process for any staff member to come in, add, edit, or delete a web page or any of its components. For now, the pages are managed within a JSON-formatted Typescript file that defines the content of any given page.
In this example snippet of our industry airlines page, we have an array of sections that are rendered in their respective order, each with their own identifier: Hero, Intro, BenefitCards. These identifiers are used to indicate which component will be used for that set of data. Let’s take our Intro set for example, when it’s time for the Intro component to be rendered, the content generation app will read the id for intro, match that with the corresponding intro component, pass the data into the component, and then render the component with the given text and styling.
We are able to access the industry airlines page because we named our section as ‘airlines’ in the data structure. To access this page, we will visit the airlines industry page at ‘/industry/airlines’. The app knows that in order to access this data, we have to take a look at the parameters for our URL and access the content with the matching parameters.
The way that the project is structured allows for staff members to come into the file, easily add, edit, or delete components from any page without the hassle or worry of breaking anything else in the project. Everything is built to render any change made to the data structure. In the future, a proper content management system will be added that will generate and update this data structure through a more user-friendly interface.
Components
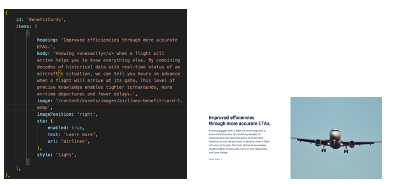
Let’s talk about the components. Currently for the industry pages there are a total of 10 different components, each with their own data types. Let’s dive into one of my favorite components, the benefit cards.
Each benefit card has its own heading, body, links, and image. However, we can modify content position, background style, and text format all through the data structure. Here are some examples below:
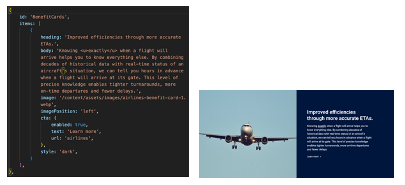
The FAQ section was another component that had its own interesting challenges. This component was built purely with CSS and no JavaScript. The animations to reveal the answer to a question while closing any other open questions was all done through CSS. It was very tempting to reach for a JavaScript library, but I knew HTML/CSS was capable of handling this interactivity. Ultimately, creating it from scratch without JavaScript was not just a rewarding challenge to tackle, but also a way of enhancing the overall web experience:
· The component can be server-side rendered and immediately interacted with by a user without having to wait for a JS file to be downloaded and run.
· Using semantic HTML to develop the accordion follows Web Accessibility best practices
The body text for the answer section also allows for semantic markup. Meaning we can easily add bold, italicize, and underline text, as well as add links to the text as the content pleases.
The Result
Here’s what the old airlines pages currently looks like (left) and what the modern pages will look like (right, work in progress):
Challenges
One of the more challenging parts of this project and internship was overcoming a lot of my own personal social anxieties and imposter syndrome (definitely not an among us reference). After meeting and getting comfortable with my peers, it was incredible how easy it was to work along-side them. Feeling that sense of belonging within work culture makes a huge difference in how productive and impactful one feels in their job.
On the technical side, my challenge was understanding and applying SSR (server-side rendering) and CSR (client-side rendering) knowledge into the project. I had very little understanding of what that meant when first starting off, but now I have a stronger grasp that I can hopefully one day apply at my next position. SSR and CSR have their pro’s and con’s when it comes to rendering components. SSR allows for components to be rendered on the server, allowing for the server to do all the heavy lifting of compiling and creating static html, which improves SEO and allows for pages to be cached and loaded almost immediately on subsequent visits. The disadvantage is that you cannot create components that are reactive, they are required to be static once they are served to the client. CSR dynamically renders components on the client-side through the browser’s DOM, allowing for dynamic changes and reactivity. The disadvantage is that pages are required to use JavaScript in order to render these components/use their functionality (hydration). Pages cannot be cached for faster serving, and SEO could be impacted depending on how the page is built.
Conclusion
Overall, I thought this project was very interesting because it was my first time dealing with TypeScript and learning about web development best practices. I learned a lot about tailwind CSS, dynamic importing, and redirecting users within the NextJS project configuration. I learned about the deployment process within FlightAware, including all the Kubernetes and cloudflare configurations. I learned a lot of industry practices including the concept of agile methodologies, team coordination, and peer reviewing. I am grateful for this opportunity and cannot wait to apply what I have learned here in the future and I’m looking forward to learning more and creating bigger and more vast projects.
Jin Woo Oh

Hello! My name is Jin Woo Oh, and I’ve worked as a Software Engineering Intern on the Predictive Technologies Crew at FlightAware this summer. I studied mechanical engineering at the University of Illinois at Urbana-Champaign (B.S.) and Seoul National University (M.S.) then shifted my career to machine learning by pursuing an online master’s degree at Georgia Institute of Technology in data analytics. Using machine learning models to help make data-driven decisions and solve real-world problems has been something that I was deeply intrigued by.
Working at FlightAware provided me with an opportunity to challenge myself by tackling unfamiliar problems and learning new tools. I had the fortune of working with talented and humble engineers that helped set a standard for me to strive towards in my nascent career in software engineering. Ultimately, this internship helped me understand that passion and willingness to learn can take me far even if I might be coming from a different academic background.
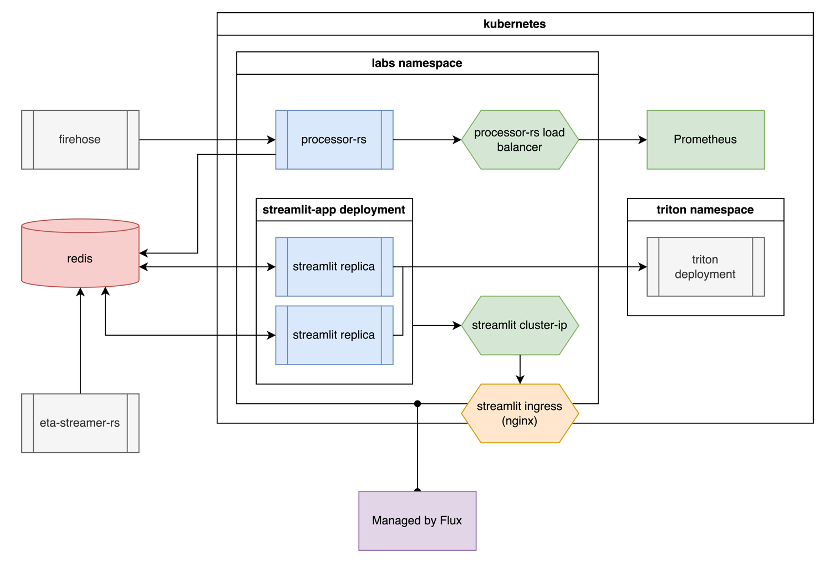
One of FlightAware’s well-known flagship products is Foresight Labs. It is a publicly accessible web service that provides industry-leading machine learning predictions for arrival runway probabilities over time, and predicted gate arrival and taxi times for a particular flight at each possible arrival gate. The system works by taking feature vectors for various flights from the Redis server, which receives metadata, feature vectors and prediction quantiles from two sources: firehose and eta-streamer-rs. Firehose is a public service that provides real-time flight metadata, such as aircraft positions and flight plans, in the form of a raw feed. eta-streamer-rs is how the Predict team makes ETA (EON and EIN) predictions available to downstream consumers – it draws data from controlstream (which is the main data feed within FlightAware). The feature vectors from the Redis server are parsed and sent to the Triton inference server over GRPC to make predictions. All of this process is wrapped in an open-source, interactive Python framework called Streamlit.
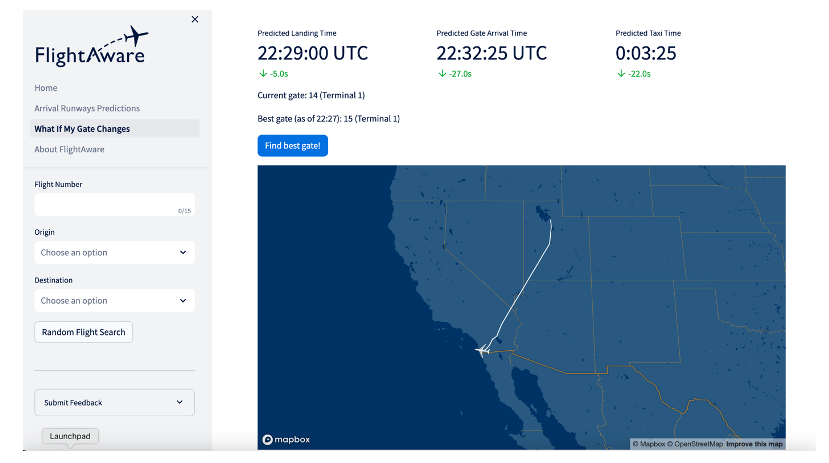
During my time at FlightAware, I developed an API for the “What If My Gate Changes” feature on Foresight Labs, which I named “FLAPI”. It makes connections directly to Redis and Triton servers to fetch metadata, feature vectors and prediction quantiles to return predicted taxi-in times for a hypothetical gate change that occurs for a specific flight.
There were a few reasons behind the need for this project. The first and foremost was the long-term goal of expanding the functionality of FlightAware’s AeroAPI, which is a simple, query-based API product that gives developers access to a variety of FlightAware's flight data. The purpose of my project was to create a prototype API that would serve as a steppingstone in that long-term goal, all while developing a tool that can easily access the predictive capabilities of Foresight Labs for internal use within the company. There were also clients who were interested in seeing an API for Foresight Labs, as well.
On a personal level, what really motivated me to pursue this project was the learning opportunity it provided. It aligned very closely with my goal for the internship, since I got a chance to try something new to me such as building an API, getting a taste for all of the steps in product development from creating my own application and improving it to version control and deployment, using vital orchestration tools like Docker and Kubernetes in an industry setting, and much more. The icing on the cake was that I got to work with a live product and contribute to a developmental process that could lead to another product, which is not something that an intern generally gets a chance to do. In retrospect, it was also a great problem to tackle because it required me to seek help from many people, both from within my team and outside, who all had their own areas of expertise to impart knowledge on the various steps that I was stuck on along the way.
The very first step of my project involved setting up my dev environment and cloning the repository to begin working in that local environment. The initial short-term goal was to get that cloned local copy of Foresight Labs running successfully. This helped catch two birds with one stone, since the process helped me do a deep dive on all parts of the code base and figure out which of the functions in the code base were viable candidates for my API.
One of my most memorable lessons in this internship came early. Because it was my first exposure to working with industry-level code base, I found it to be a daunting task. But my mentor Nathan helped get me started by going through the early parts of the code and explaining the algorithm step-by-step. This was one of the key learning moments during my internship and for my career in software because it helped me realize that it’s okay to be intimidated by long blocks of code. When I worked on my personal projects, I was used to running code line by line on Jupyter notebook to analyze other people’s programs. Nathan assured me that it’s okay do that and encouraged me to use a method that works for me. Going through a program line by line allowed me think for myself on the direction that the program was headed and the intention behind the algorithm, which helped me look at the code in blocks instead of lines, and eventually look at hundreds of lines of code in sections that I could comfortably visualize. Eventually, when I finally got Foresight Labs running locally on my machine, I was thrilled. Although it was an application that was already developed by someone else, being able to replicate the functionality gave me the first sense of real accomplishment and hope that I can tackle much harder challenges to come.
Also, because this was my first real position as a developer, there were not just conventions and best practices that I had to pick up, but also mistakes to learn from – a large part of which was backing up work and documenting things I learned. For example, the dev environment that I set up for my Jupyter Notebook that I was running in my KubeFlow cluster reset for no reason one day, and I had to spend a great amount of time retracing the questions that I had asked to multiple people. My advice for future interns would be to always take notes and document the steps to a process, even if you don’t think you’ll need it again.
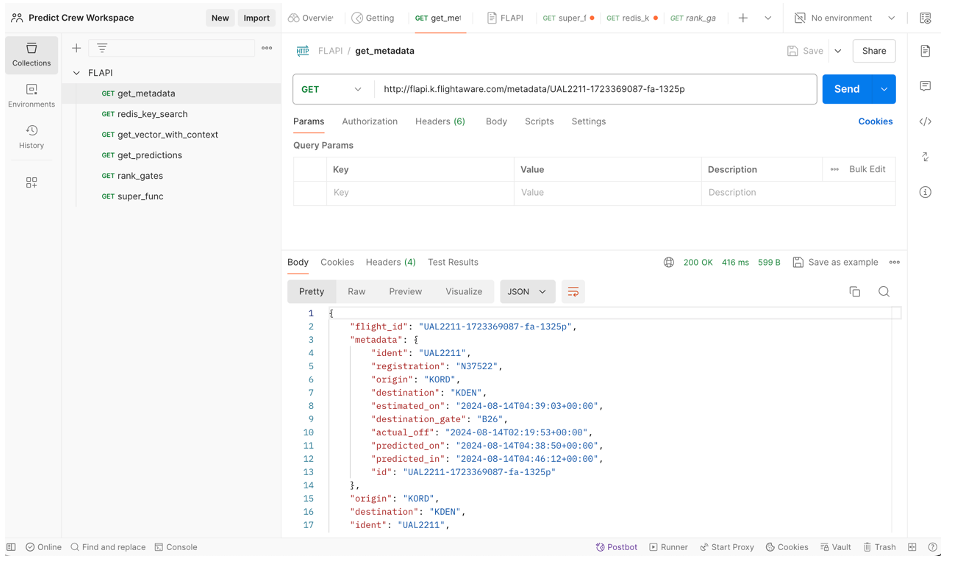
Once I understood the algorithm behind Foresight Labs, I learned how to make a simple application using FastAPI, which is an open-source web framework for building APIs with Python. During the process of creating a working prototype, I learned that I could use a GET endpoint for fetching simple data in hashable form, and a POST endpoint for returning complex data outputs that required complex JSON payload inputs. Using these two primary endpoints, I added a variety of useful functions to the API. For example, get_metadata() returned the flight number, origin and destination airports, destination gate, predicted landing and gate arrival times, etc in a dictionary format when passing flight ID as its input. I also created more complex functions like rank_gates(), which returned a sorted dictionary of gate-terminal tuples for the given destination airport of a specific flight with their respective scores, sorted from lowest score to highest. The lower the score for a particular gate-terminal pair, the shorter the taxi-in time between the plane landing and arriving at the gate. The purpose of the function was to give the consumers options to choose a gate-terminal pair among the top choices such that when there are multiple candidates of similar taxi-in times, they could utilize the domain knowledge that the model cannot account for (such as traffic situation, constructions, on-site incidents, etc) to make the best decision. Lastly, I added a super function that conveniently returns all of the metadata, predictions, predicted landing/arrival/taxi times, and ranked gates in dictionary format. These endpoints were tested and documented on Postman, which is a platform for building, testing and managing API’s.
After completing the first functioning iteration of my application, I sought to improve its performance by tackling some of the difficulties in handling data. A significant challenge that I faced while working with the dev server for Redis was that the flight ID’s associated with the eta-streamer’s feature vectors and predictions were different from the flight ID’s associated with firehose’s metadata. So for one particular flight, the Redis keys tagged with eta-streamers’ test flight ID and the Redis keys tagged with Firehose’s production flight ID were different. Fortunately, these flight ID’s had the same flight numbers, and their respective timestamps were off by no more than 10 seconds. After conducting some tests with these observations, I was able to develop an internal function in the API to automatically match the test and production flight IDs for a given en route flight. This made it easier to get Triton predictions and the metadata for the same flight and helped simplify my code.
The application performance was also enhanced by removing unnecessary components and packages. Because Foresight Labs was built on Streamlit, a lot of the functions in What If My Gate Changes and its modules, including connection requests to Redis and Triton servers, relied on Streamlit to function. However, my application did not require an interactive web framework to function. Removing the Streamlit components from the API code base and the Streamlit-dependent module imports made the application more efficient and lighter.
In the final stage of application improvement, I requested a code review session from the Predict Crew and received helpful feedback to clean up my code before deployment. This was a beneficial session that helped with not just my application but for myself to learn some of the best practices in coding. I implemented most of the suggestions in the final version.
The next phase in my project was application deployment. Although I had some self-taught experience with creating and using a docker container as a testing environment for my personal projects, I had no knowledge of selecting a proper image for my FastAPI application, and version control of images via pushing and pulling to a private docker registry. I started by going through tutorials and documents and created practice images and containers before I sought advice from my team on how to build an image for my specific application needs.

After verifying that my containerized application ran without issues, I composed a deployment.yaml file and attempted to deploy it within my local Kubernetes cluster. Another major hurdle in my project came when I noticed that my Kubernetes pod was facing a CrashLoopBackffOff error. It was caused by a compatibility issue between the docker image and the environment it was being deployed on. The MacBook Pro M1 I was using throughout the internship built docker images in arm64 (64-bit architecture used in ARM processors) by default, which could not natively run software compiled for x86. What I needed was to build a docker image with an amd64 (also known as x86-64, the 64-bit extension of the x86 architecture) format, which is backward-compatible with the 32-bit x86 architecture, which is what most cloud environments and Kubernetes clusters have. In facing this problem, I learned that a multiarchitectural build using the “docker buildx” command could create a docker image that is compatible for both systems. Eventually, however, I adopted my teammate’s simpler solution to build the docker image in one of FlightAware’s internal Linux-based dev hosts to circumvent the issue, as image was built in amd64 format by default in that environment.
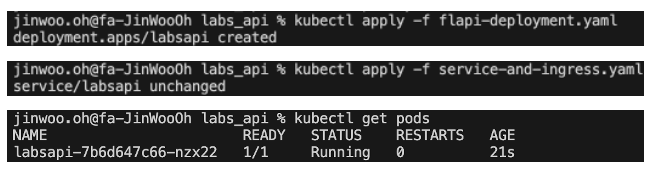
Once I verified that the application was deployed successfully without errors in my local cluster, the final step was to launch my application via an on-prem deployment. I accessed the Rancher platform for FlightAware to acquire the yaml file that was to be used to revise my kubeconfig file. This would add and access the Houston dev cluster to create my namespace in. Since the purpose of deploying on the Houston dev cluster was to allow internal access for members of FlightAware to use the API, I needed service and ingress files to be applied to my Kubernetes pod:
• service.yaml - exposes the service on a virtual IP address (VIP) that is only reachable within the cluster. Other services and pods within the cluster can access it, but it is not accessible from outside the cluster
• ingress.yaml - manages external access to services in a Kubernetes cluster, typically HTTP. Allows exposing multiple services under a single IP address and manage them using URL paths or hostnames.
Combining the service and ingress yaml files into one, I used the “kubectl apply” to expose my application to port 8125, which is now accessible to all internal members of FlightAware on flapi.k.flightaware.com.
There are several things that can be done in the next steps of this project. One would be to replace the placeholder host that I used for the Triton inference server. In the development stage, I used a temporary host instead of the production server to establish Triton connections. This will need to be changed in order for FLAPI to provide accurate predictions. Another task on the agenda would be to replace the Streamlit-based Redis and Triton connections on the original What If My Gate Changes code base for Foresight Labs to GET and POST requests to my API endpoints, which will simplify the program.
I have faced and overcome many challenges throughout the internship, but there were some that I wish I could have done better. Keeping up with creating and updating Jira tickets in a timely manner and backing up the changes to my application and docker image, no matter how small, to both my GitHub repositories and the docker registry proved to be difficult. I believe this is something that a lot of software engineers still find difficult to make a habit of, but given more time to actively develop these practices I believe I can improve on these areas.
Time management, especially with regards to balancing work and relaxation and consistently setting specific goals was another big challenge. Although I have discovered in recent years that my tendency to treat programming problems as puzzles and to not give up on them easily proved to be compatible with this profession, I also found it to be hard on the body and mind. Because it is difficult to gain enough momentum to get in “the zone” on a regular basis, I found myself making the most out of that high-focus state and deeply invest myself on work for days or couple weeks at a time. However, when those sprints came to an end, either due to a huge mental block or a sense of accomplishment, it became very difficult to focus and bring up my productivity, even to an average level. Fortunately, I learned that setting very specific short-term and long-term goals, oftentimes by asking my manager and my mentor what I should do next, helped motivate me to keep moving forward, even if at a slower pace.
Last, but not least, asking good questions throughout various stages in the project proved to be very difficult during my internship. This was something that I was especially concerned about since the start of the internship. Because I was coming from a different field and academic background from my intern cohorts, the sense of imposter syndrome, coupled with my tendency to try every single thing I can think of to solve a problem before calling it quits made asking questions even more difficult. A rule of thumb that my mentor Nathan suggested that proved to be immensely helpful for me is to apply the “half-day rule” where I would limit myself to working on a problem for just half of the working day before asking teammates for help. It was a very effective method that incorporated a healthy mix of grit through self-teaching and humility through advice-seeking. It is a technique that I will be sure to take beyond just my career in software engineering.
There were many other interesting projects that I wish I had more time to explore, such as the XGBoost-based arrival-runways prediction model. Although currently very effective, it would have been interesting to explore how different feature engineering techniques, such as addressing data drift, implementing sufficient dimensionality reduction techniques like sliced inverse regression and Principal Hessian Directions, and accounting for seasonality across months, seasons or years would affect the accuracy and computational efficiency of the resulting model. Along with feature engineering, exploring algorithms other than LightGBM, CatBoost and XGBoost for the arrival-runways model to measure the overall performance of the model would be something I would love to try if I could return to FlightAware.
I am deeply grateful for all the support that I received from my mentor Nathan, manager Adam, the Predict Crew, and all members of FlightAware that helped me grow as an engineer and as a person throughout this internship.