
Encryption is all around us. From the websites we visit to the emails we send; from important business and governmental contracts to automated API interactions, SSL/TLS and PKI are there to ensure we can conduct our business safely and securely. Or so we are told. But how do these inscrutable yet omnipresent technologies work? What benefits do they actually provide? And what are some of the risks and pitfalls of their implementation? Most importantly, what is the difference between SSL and TLS, really? Keep reading my dear reader, and you will uncover the deep mysteries and arcane knowledge of these critical components of our online (and offline!) internet infrastructure.
SSL vs TLS

The story of SSL, which stands for Security Sockets Layer begins back in internet dark ages of 1995 when it was first developed at Netscape. SSL was developed as a protocol to establish the identity of a remote party (namely a webserver) and come to an agreement on the cryptographic parameters for establishing an encrypted communication channel. The first version of SSL was never formally published due to significant security weaknesses identified early on, but SSL 2.0 was formally released in early 1995. It too, was quickly discovered to have serious security flaws, and in 1996, SSL 3.0 was published by Netscape. At the time, Netscape was the leading web browser, but faced serious and significant competition from Microsoft with its Internet Explorer. Microsoft had started working on its own version of SSL called PCT, and in an apparent attempt to head off a “now we have 15 standards” situation, the IETF agreed to take ownership of the protocol from Netscape. As part of that agreement, they agreed to make some changes – including renaming it to TLS. Thus, in 1999 (the same year as the first Matrix movie, if you want to feel old – or young), TLS 1.0 was released as RFC 2246. The rest is, as they say, history.
How Does TLS Work?
Excepting the STARTTLS situation, which we will get to later, the TLS protocol starts immediately after the TCP 3-way handshake has completed with the client sending a ClientHello. This message contains information about which protocol version(s) the client supports, what types of encryption parameters are supported, compression parameters, a random number, a session identifier (if an existing session is being resumed/restored), and a number of other possible extensions depending on the TLS version used and the client configuration. The server then responds with a ServerHello message that confirms the protocol version, compression, and the encryption parameters to be used which are selected from the lists provided in the ClientHello. This message also includes a server random value and potentially one or more extensions depending on what was sent by the client. The server then sends a ServerCertificate message containing its certificate. Depending on the cryptographic protocols selected and the type of key used in the certificate, the server may also send a ServerKeyExchange message with additional information needed to establish a shared key for encrypting the data. The server then sends a ServerHello Done message to indicate it has no more data to send for setting up the key exchange. If the client has a certificate to send for client-authentication, it will send a ClientCertificate message potentially followed by a ClientKeyExchange message. The client will then send a ChangeCipherSpec message telling the server that it has computed the shared encryption key and will start sending all future traffic encrypted using the parameters set in the handshake. The client will then send a Finished message, fully encrypted with a hash over all the previous data sent that the server then verifies. If that verification succeeds, the server will then send its own ChangeCipherSpec and Finished messages and then all future data between them will be encrypted.

Nice and complicated, right? And that was without any mention of the numerous TLS extensions like SNI or ALPN. This complexity is, arguably, one of the reasons for a number of vulnerabilities which have mostly led to adding even _more_ complexity in order to mitigate.
Thankfully, the authors of the latest TLS specification, TLS 1.3, have taken the opposite approach. TLS1.3 reduces the complexity by enforcing only a small set of known secure ciphers and key exchange algorithms which allows the client and server to more easily pick one and setup all the necessary parameters without a bunch of coordination. Notice in the diagram above how there are two round trips (the 4 green arrows)? With TLS1.3, the second round trip is eliminated as the client sends the ClientKeyExchange information in its ClientHello message.
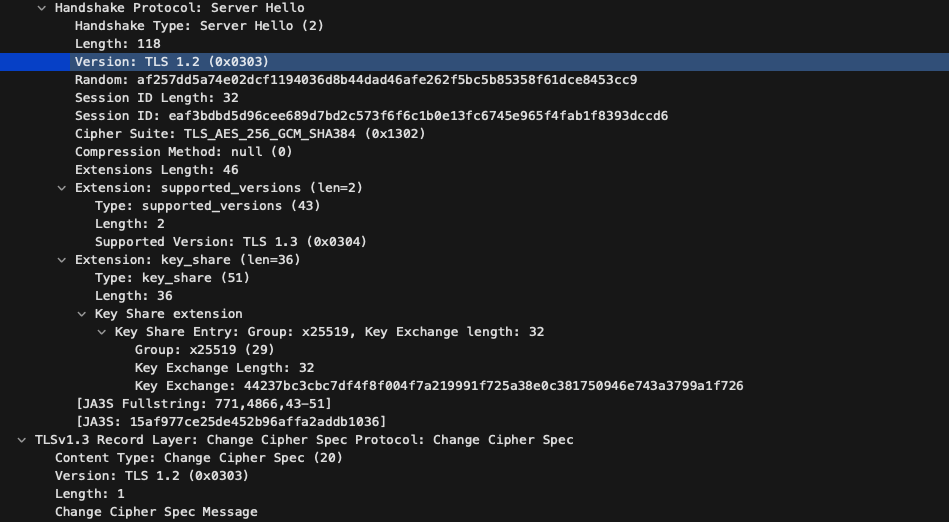
Despite everything though, the practicalities of reality invariably intrude on the idealized state imagined by protocol designers. Shortly after TLS1.3 was initially released it was discovered that a number of middleware devices deployed in the wild did not like the changes in the protocol and would cause connections to fail. These middleware devices are generally corporate-owned network security devices that transparently intercept and decrypt the data so the underlying protocols can be inspected. Replacing an updating them would likely be infeasible and significantly delay the implementation. So the designers at the IETF went back and modified the TLS1.3 handshake to look more like TLS1.2 as you can see in this packet capture below:
The client is indicating that this is a TLS1.2 Hello packet, but an extension is used to indicate that it also supports TLS1.3. When the server replies, it does the same thing, though the list of versions in the extension has been reduced to one: the chosen version.
Certificates
TLS uses two different types of encryption to provide security for a connection: asymmetric cryptography (also known as public key cryptography) and symmetric cryptography. Symmetric cryptography is very fast and suitable for streaming lots of encrypted data back and forth – but it requires both parties have a single, shared key. How do you safely communicate a shared key across the internet where anybody could be listening? Well, you use asymmetric cryptography, of course! With asymmetric cryptography the key is split into two parts: a public key that can be shared and a private key that must be kept secret from everyone. These two parts are linked by some mathematical magic (this is not the mathematics/cryptography blog entry you are looking for) such that something encrypted using the public key can only be decrypted by something with the private key and vice versa. This property is critical as it allows the client to send data needed for setting up a symmetric key to the server by encrypting that data with the server’s public key. The client knows only the server can decrypt that data, so everything is safe. But wait, how do you get the server’s public key? And how do you know you have the right public key for the server you are trying to talk to? That’s where certificates come in!
An important component of the TLS handshake is the server supplying its certificate. Certificates contain the server’s public key which is needed to securely generate the shared session key – the symmetric cryptography key. But a certificate contains much, much more than just a public key. It also supplies identity information about whose public key you’ve got. But hey, anybody can write “Steve” on a label and stick it to their shirt – how do you know that just because the certificate says it’s for www.flightaware.com that it really, truly is? This is where Certificate Authorities come in – third party entities whose job it is to validate the identity of a public key holder.
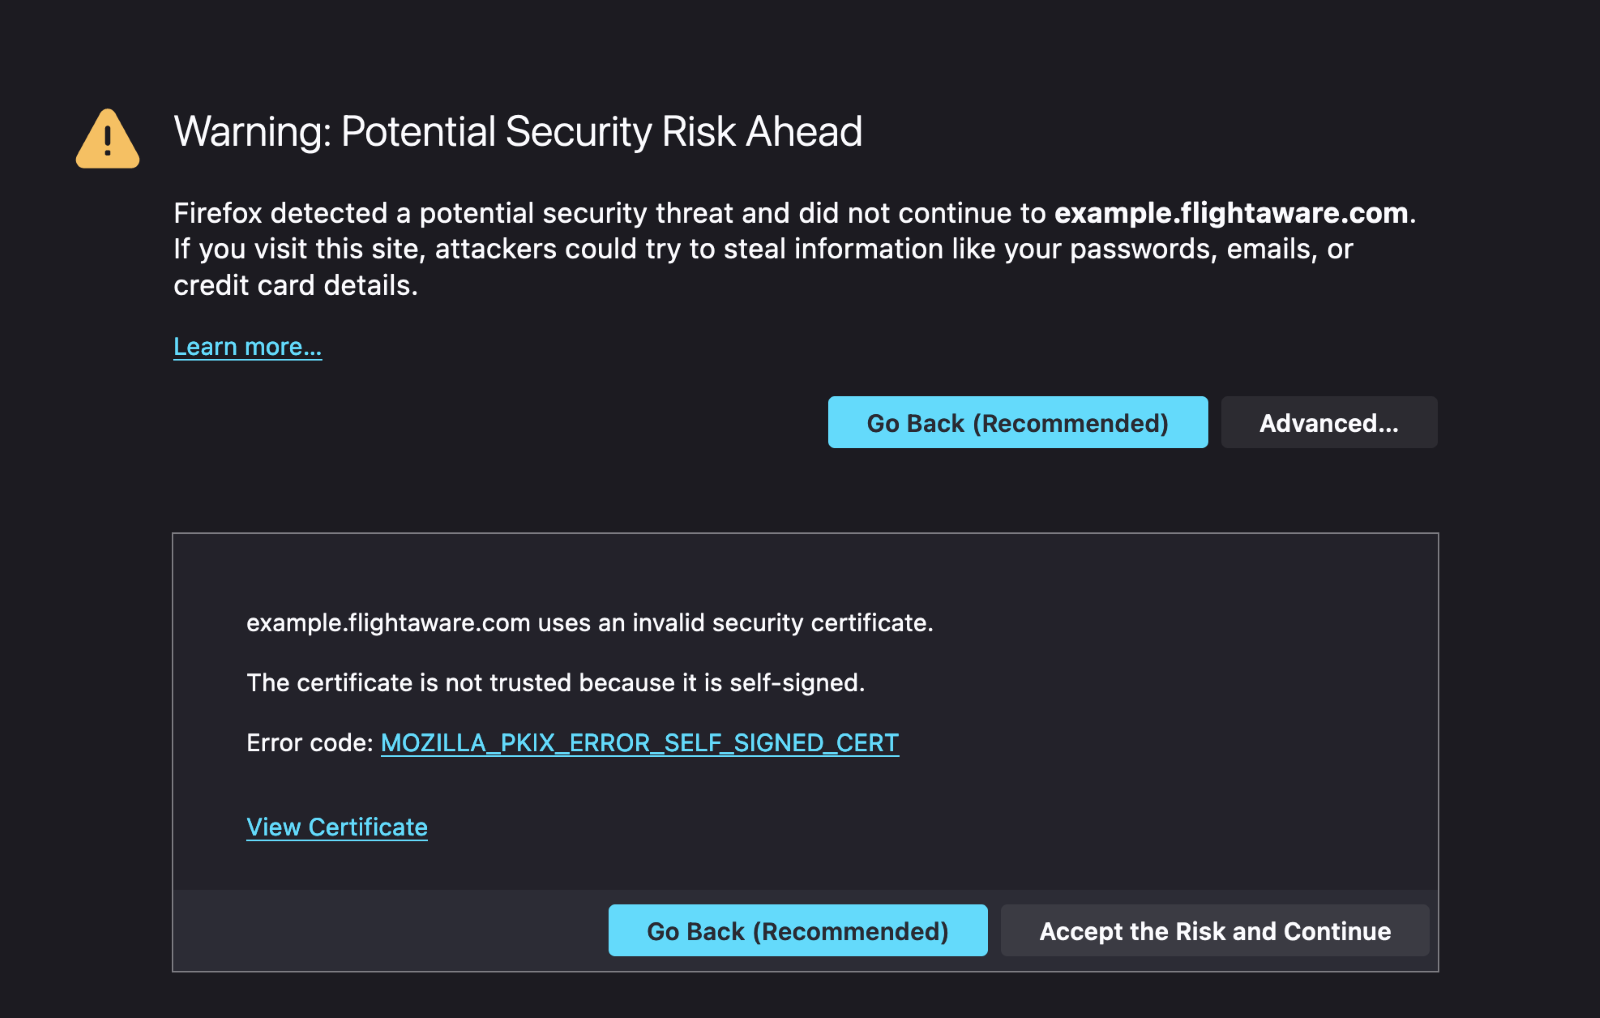
We’ve all seen some version of this error before. For some reason, your browser has decided it doesn’t “trust” the certificate presented by the server. Why? Your browser (and operating system, and phone, and sometimes individual applications) all have a list of trusted certificates. Certificate Authorities spend a lot of money convincing the companies and organizations that manage these lists that they are following all the necessary security practices for managing a CA and properly validating the identity of those requesting a certificate. The CA/Browser Forum is a group of CAs and browser vendors that meet to set these standards.
That setup works fairly well to help ensure that public CAs continue to invest in maintaining the security standards and rigorous processes to maintain their trusted position in the ecosystem. But what if you just happen to operate a network of over 35,000 ADS-B receivers, that you want to maintain trusted connections to, but don’t need the trust assurances of a 3rd party? Or maybe you have internal systems that aren’t connected to the internet and are thus difficult to get verification from a 3rd party? In those cases, you may want to operate your own CA and build an internal public key infrastructure (PKI). From a technical perspective, this is not difficult to do at all – create a self-signed certificate with the “Certificate Authority” constraint set to “true”, put the cert in your clients’ trust stores, and then start signing client certificates. There are plenty of guides on the internet that can explain how to use a tool like OpenSSL to generate and sign certificates. Most of the work is in managing the policy and administrative functions: What information needs to be in the cert? Who will issue certs? How will the identity of the requestor be verified? How will you manage revoking certs with compromised/lost private keys?
Anatomy of a Certificate
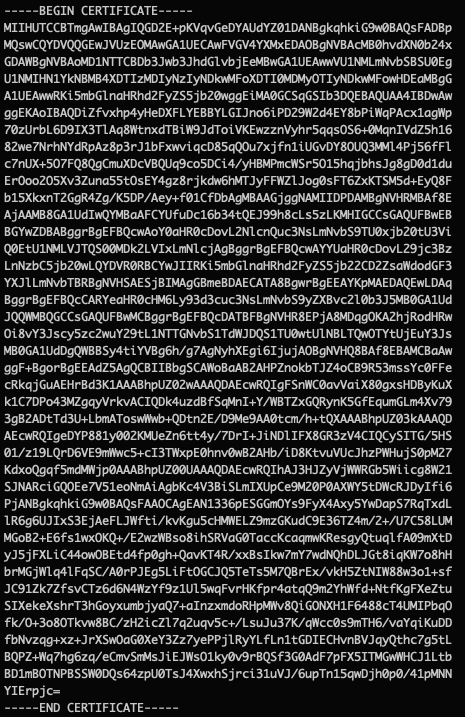
Though a certificate is conceptually simple, the X.509 standard that defines the format of a cert has been extended and expanded over the years to accommodate a diversity of use-cases and to address various security issues. Lets take a closer look at the parts of a certificate, using our very own cert from www.flightaware.com for an example. Normally, a certificate is stored in a binary format, the structure of which is defined by an ASN.1 specification and serialized per Distinguished Encoding Rules (DER). That’s generally not a very friendly format to work with, and so most commonly the binary data is converted to text with base64 encoding and is stored in Privacy-Enhanced Mail (PEM) format:
Even that is a bit inscrutable, so we will use a handy openssl command: openssl x509 -in <filename> -noout -text to convert that into a nice human-friendly format.

First, we have some information about the certificate: the version of the x509 specification used (version 3) and a serial number assigned by the CA that must be unique across all the certificates generated by that CA.

Next, we have some identity information: the issuer is the CA certificate that signed us. The subject is the owner of this certificate. Note that these fields are both in Distinguished Name (DN) format – if you’ve ever used LDAP these fields will look familiar. That’s because X.509 is part of the X.500 standard developed by the telecommunication industry that was intended to be part of a global directory service – a white pages for the internet age. Due to a number of technical, legal, and administrative hurdles, this global directory never fully materialized, but the X.509 standard was adopted by the IETF for use on the internet.
You’ll notice there are also two dates specified, known as the “validity period”. Though it is commonly accepted that this end time is in place to protect against unknown loss or theft of the certificate’s private key this is not the intent and, in most cases, not the actual practice of managing X.509 certificates. The validity period is specifically for the certificate, not for the related public/private keys. Most CAs will accept a renewal with the same public key (and thus the same private key) and many will even make the renewal process easier by saving/re-using the same exact certificate request information (which includes the public key). Thus, the validity period is best described as the time period during which the CA is willing to assert the identity information associated with a certificate is valid. If credential theft or loss is a concern, a new public/private keypair should be generated for every new certificate validity period.
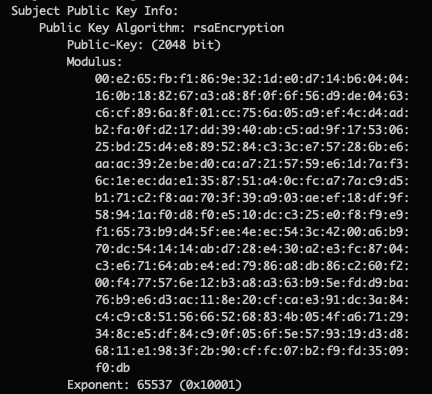
Continuing on, we have the public key information itself which indicates the size and algorithm used to generate the key. In our case, it’s a 2048 bit RSA key.
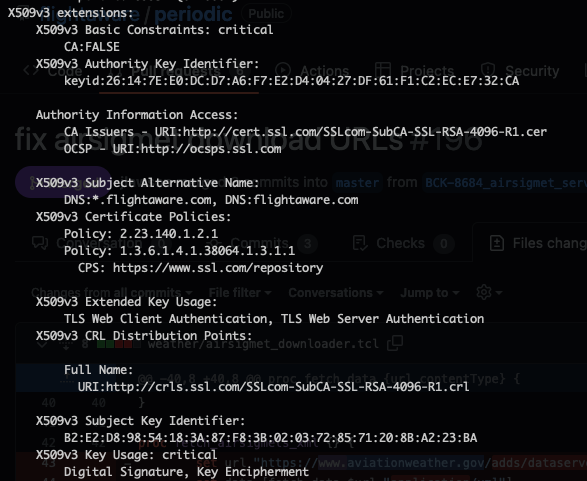
The next section is the X.509v3 extensions which will differ depending on the CA and how they are setup. A few elements should always be present though. Basic Constraints should include information on whether the certificate is able to sign other certificates or not. In our case, it is set to FALSE as this is a server certificate. The Key Usage and Extended Key Usage should be set depending on the purposes the certificate is intended for. Modern certificates should also have at least one Subject Alternative Name (SAN) set that matches the CN in the Subject section above. Additional names or IP addresses may be specified if the server is in a shared environment that provides a number of services or services under other aliases. When a client connects to a server, it checks that the Common Name (CN) in the subject or at least one SAN entry matches the name of the host. If this doesn’t match exactly, you’ll get an error from the client.
There are other sections as well including OCSP and CRL locations. These two services involve managing certificate revocation. If a certificate key is known to be compromised or the certificate was issued in error, the certificate can be revoked – an indication that it is not valid and should not be trusted by any client. CRL or Certificate Revocation List is the legacy mechanism whereby a CA publishes a list of every certificate that was revoked, and clients must download and check the list. OCSP or Online Certificate Status Protocol is a more efficient variation where the status of just a specific certificate can be checked. OCSP stapling is a feature provided by some servers where the OCSP response is cached by the server and included with the certificate. Since the OCSP response is signed by the CA with the same certificate that signed the server cert, the client can trust it is valid and doesn’t have to make extra connections to validate the certificate.
Finally, the certificate is signed by the CA and this signature appears at the end along with an indication of the signing algorithm used so the client can confirm that the certificate has not been tampered with. The signature can be verified (with more math magic!) by checking the public key in the CA certificate. This process is repeated for every signing certificate until one is reached that exists in the client’s trusted certificate (or trusted root) store. This is known as the chain of trust and can, in theory, be arbitrarily long, though in practice there are usually no more than one or two intermediate CAs between the trusted root and the leaf certificate.
Its about trust
At the end of the day, all these technologies are about building and managing trust. Can you trust that the server you are talking to really is the one you want? Can you trust that the bank information you’re sending over the public internet is safe from modification or eavesdropping? Are you sure that email really is from John? Understanding how these technologies work can help you answer these questions. Though there is a lot of technical complexity involved, certificates are essentially just identity documents, not much different from a drivers license or passport. It is worth noting that while a certificate CAN tell you if the server you are connected to is named www.flightaware.com, it cannot tell you if that is the right server for tracking your aircraft. A nefarious actor could just as easily get a certificate for www.fightaware.com or www.flightwarez.com and if the certificate is valid, you’ll hear no complaints from your browser. Extended validation (EV) certificates, which show additional identity information, are one attempt at solving this problem, but they still ultimately rely on the end user knowing what the correct name should be. As the old Russian proverb goes: “доверяй, но проверяй” (Trust, but verify).